How to plan with Celeris: fundamentals and settings
The map, 3D view and time controls always share the same viewpoint and moment. This reference explains the whole interface without turning every icon into a chapter of its own.
01Set the camera position on the map
Move the map until the crosshair sits on the intended tripod position. Celeris calculates directions, terrain and times from this point. The small pin beside the crosshair saves the place.

Map with the shared top row, crosshair, place pin, zoom and time controls. 02Choose a subject, date and time
Switch between sun, moon, Milky Way and a celestial object at the bottom. Set the date with minus and plus, then drag the time band. “Now” jumps to the current time at the selected place.
03Open the 3D view
Tap “3D” with the cube icon at the top. Drag to look around and pinch to change focal length. The bright rectangle is the photograph; “Map” returns to the exact same standpoint.

The complete 3D view with camera frame, tool columns, mini map and time controls. 04Enable tools only when needed
The round controls in 3D manage focus mode, star trails, rainbow, ground fog, time playback, frame orientation and phone aiming. Some controls appear only after their tool is enabled.
05Use More for persistent choices
The three-dot menu opens saved plans and places, calendars, eclipses, ISS transits, object management and settings. Display changes apply to the map and preview immediately.
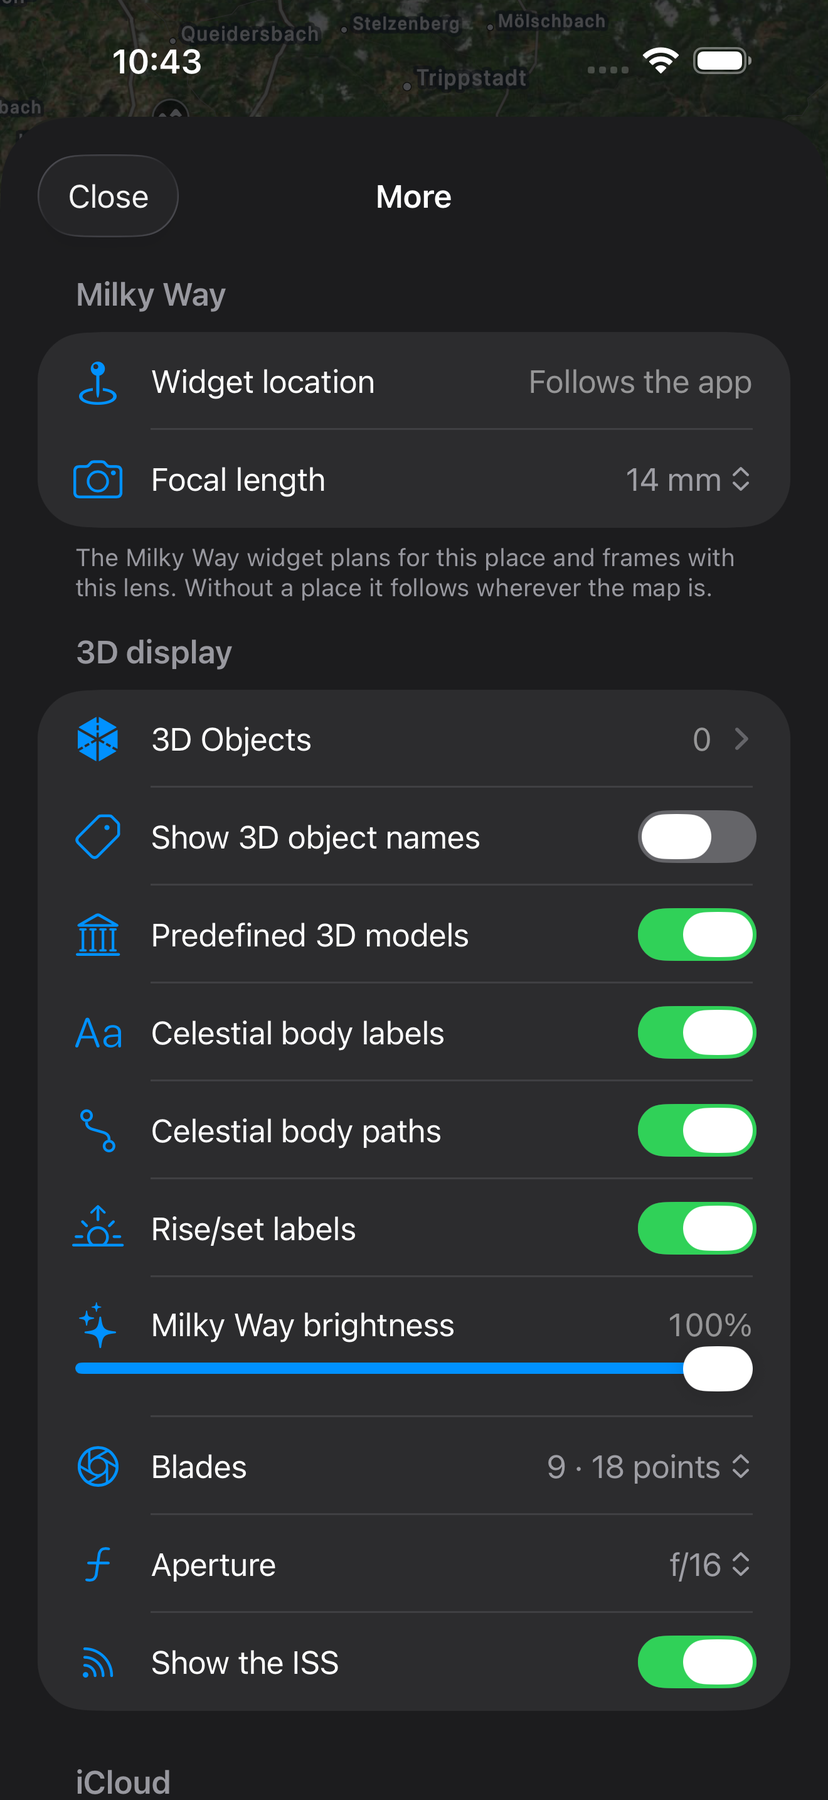
More keeps the widget and 3D display settings together in one list.
Top row – on the map and in 3D
- 3D · cube / Map
- Switches between the map and full 3D view without losing the viewpoint or direction.
- Bookmark
- Saves the current plan with place, time, subject, focal length and 3D state.
- Lightbulb
- Finds the next suitable rise, dark night or other event.
- Magnifying glass
- Searches for a place on the map; in 3D it opens the celestial catalogue.
- Location arrow
- Moves the map viewpoint to the device's current position.
- Three dots (…)
- Opens More with collections, calendars, settings, licences and app information.


Map and time controls
- White camera marker / crosshair
- Marks the calculated camera position. Move it by moving the map underneath.
- Pin with plus
- Saves the viewpoint without creating a complete photo plan.
- Zoom rail with plus and minus
- Zooms the map; pinch-to-zoom works as well.
- Sun · Moon · Milky Way · spiral
- Selects the subject used for pages, tracks and event calculations.
- Object name
- Opens the catalogue for the spiral tab and shows the selected celestial object.
- Date · Now · time band
- Minus and plus change year, month and day. “Now” and the draggable band set the time.


Tools in the 3D view
Not every icon is always visible: AR needs phone aiming, while ground fog needs downloaded terrain.
- Crosshair on the left
- Centres the selected celestial object in the frame once.
- Viewfinder on the left
- Keeps the selected object centred as time changes.
- Crossed-out eye
- Hides controls and labels for an unobstructed view of the scene.
- Star with trail
- Enables star trails. Its arrow opens duration controls.
- Three rainbow arches
- Shows the possible position of a primary rainbow opposite the sun.
- Cloud
- Simulates ground fog. Its arrow opens layer-top and visibility controls.
- Play / Pause
- Runs time. Expand it to choose direction and speed.
- Portrait or landscape
- Rotates the camera frame between portrait and landscape.
- Phone with crosshair
- Uses the phone sensors to aim instead of dragging the view.
- AR
- Places the calculated sky over the live camera image. It appears after phone aiming is enabled.
- Walking person
- Starts AR navigation to the saved camera position so you can find the planned spot outdoors.
- Mini map and pin
- Shows direction and field of view. Its arrow hides the map and its pin saves the viewpoint.


Every setting under More
- Widget location
- Lets the Milky Way widget follow the app or plan for its own fixed place.
- Focal length
- Sets the field of view used by the Milky Way widget.
- 3D Objects
- Opens the list and editor for your custom models.
- Show 3D object names
- Shows or hides names of your custom models in the scene.
- Predefined 3D models
- Downloads and displays the landmarks included with Celeris.
- Celestial body labels
- Labels the sun, moon, planets and selected stars or deep-sky objects.
- Celestial body paths
- Draws the daily paths of displayed celestial bodies.
- Rise/set labels
- Labels rise and set points along those paths.
- Milky Way brightness
- Changes only the band's visibility on map and preview, not its real brightness.
- Blades
- Sets the number of rays in the sunstar simulation.
- Aperture
- Controls the simulated sunstar's size and strength.
- Show the ISS
- Displays the space station in 3D when current orbital data is available.
- Sync with iCloud / Google Drive
- Optionally syncs plans, places and custom models within the respective platform. Android also shows Sync now while sync is enabled.
- Plans
- Opens saved photo plans.
- Locations
- Opens saved camera viewpoints.
- Calendar
- Shows a month of suitable dark nights; part of the full version.
- Eclipses
- Lists solar and lunar eclipses years ahead; part of the full version.
- ISS transits
- Searches for solar and lunar transits and close passes at the selected place.
- Licences
- Lists data sources and open-source licences.
- Info
- Shows the app version, website and contact details.
- Rate the app
- Opens Celeris in the store when you want to leave a rating.
- Recommend the app
- Opens the share sheet with a link to Celeris.
- Delete downloaded terrain
- Frees storage. Required terrain downloads again on your next visit.
- Show introduction again
- Starts the app's introduction pages again.


Screenshots show iPhone. Android presents More as a page, while Mac also uses a sidebar and menus. Labels and functions remain broadly the same.